Monday, July 30, 2007

Condor Reconfigure

This pages purpose is to show how to reconfigure a condor pool if the master/server units IP address changes. (Note: This has happened in our case because 1: The server did not have a static IP address. 2:The direct IP address was being used instead of a domain name in condor_config CONDOR_HOST.)

The Condor Master (Fedora RC7 Linux with Gnome)

First a couple quick questions answered.

     1. Condor is located in two main directories
Actual program scripts

/usr/local/condor/sbin

Condor configuration

/etc/condor

2. No the condor master does not run auto-magically when you start the system
--well at least not in Linux

Now here is what I had to do:

1. open a terminal window and get the new IP address of the machine

/sbin/./ifconfig 

2. I had to edit the condor_config file to enter in the new IP address (In case you didn't know it the condor_config file is for both the master's config and the workers. (Note: if you are not root, you may have to type su or sudo prior to running this command)

 gedit /etc/condor_config 

change the CONDOR_HOST under Part 1 then save the config. (Note: If you cannot save, you may need to open the file as root by doing su or sudo.)

3. Now you have to start the master. (Note: If you already have the master running you may just be able to type ./condor_reconfigure)


cd /usr/local/condor/sbin
./condor_master

As long as you don't see any errors you should be good to go. 4. Check to make sure the condor is running by typing

condor_status

Assuming all went well you should get something like the following:

[condor@ecsulab222-16 ~]$ condor_status

Name OpSys Arch State Activity LoadAv Mem ActvtyTime

10-24-5-83.my LINUX INTEL Unclaimed Idle 0.000 883 0+02:15:04


Total Owner Claimed Unclaimed Matched Preempting Backfill

INTEL/LINUX 1 0 0 1 0 0 0

Total 1 0 0 1 0 0 0

Now for the workers

Condor Workers (MAC OS X, Linux, Windows XP)

Mac OS X and Linux (Note: Make sure you still have the IP address of the Condor Master)

1. Open a Terminal window and edit the condor_config file to change the CONDOR_HOST under Part 1 to the IP address of the Master

 open /Users/condor/condor_config 

Then save the file. (Note: If you cannot save, you may need to open the file as root by doing su then running the open command.)

2. You must start the master manually

cd /usr/local/condor/sbin/
./condor_master

3. Now you must force the master to take the reconfiguration

./condor_reconfig

4. After a minute or so as long as you haven't had any errors you can go back to the condor master and do a condor_status to look for the OS X machine.

[condor@ecsulab222-16 ~]$ condor_status

Name OpSys Arch State Activity LoadAv Mem ActvtyTime

10-24-5-83.my LINUX INTEL Unclaimed Idle 0.000 883 0+02:45:04
10-24-5-51.my OSX PPC Unclaimed Idle 0.010 128 0+00:09:49

Total Owner Claimed Unclaimed Matched Preempting Backfill

INTEL/LINUX 1 0 0 1 0 0 0
PPC/OSX 1 0 0 1 0 0 0

Total 2 0 0 2 0 0 0

Windows XP

1. Open the c:\condor\condor_config file. (Note: when you double click the icon and it asks what program to open in, I suggest NotePad.)

2. Change the CONDOR_HOST under Part 1 to the IP address of the Master.

3. Save the file. (Note: If you are unable to save, you may need to log in to an account with administrative privileges.)

4. Restart the computer.

5. After a minute or so once the computer has booted, and as long as you haven't had any errors, you can go back to the condor master and do a condor_status to look for the WINNT 51 machine.

[condor@ecsulab222-16 ~]$ condor_status

Name OpSys Arch State Activity LoadAv Mem ActvtyTime

10-24-5-122.m LINUX INTEL Unclaimed Idle 0.480 376[?????]
10-24-5-83.my LINUX INTEL Unclaimed Idle 0.000 883 0+02:45:04
10-24-5-51.my OSX PPC Unclaimed Idle 0.010 128 0+00:09:49
cerser1 WINNT51 INTEL Unclaimed Idle 0.000 511 0+00:09:39
cerser2 WINNT51 INTEL Unclaimed Idle 0.000 511 0+00:04:38
cerser3 WINNT51 INTEL Unclaimed Idle 0.000 511 0+00:04:38
cerser4 WINNT51 INTEL Unclaimed Idle 0.000 511 0+00:04:34

Total Owner Claimed Unclaimed Matched Preempting Backfill

INTEL/LINUX 2 0 0 2 0 0 0
INTEL/WINNT51 4 0 0 4 0 0 0
PPC/OSX 1 0 0 1 0 0 0

Total 7 0 0 7 0 0 0

Wednesday, July 25, 2007

SeaSpace (TeraScan) and CentOS

One of the tasks I set for my self at work is to reload all the lab systems with dual boot Linux and Windows XP. The university I work for has a TeraScan system installed so that we can receive imagery data directly from satellites. I decided to give Seaspace a call to see which flavor of Linux they would recommend. Well in order for the software to work you must have Redhat Enterprise installed. A site license for Redhat Enterprise is not cheap in any form or fashion. Even though Linux itself is free, the support or specialized programs to go along with it are not. As a matter of fact your looking around $9k to purchase Redhat Enterprise. I asked if Fedora which is supposedly RedHat open sourced would work. the agent informed me that they had not had good luck with Fedora, because of the many changes that have occurred in the OS.

When I heard that I though oh crap, that is gonna take a while to get passed through the budget. Thankfully the agent from SeaSpace let me know that CentOS is a direct port from the RedHat kernel. The best part is that CentOS is free! I have downloaded the ISO and I will of course keep you apprised of how it goes.

Monday, July 23, 2007

Should I really be running Ubuntu??

When I started this blog I was all about the Ubuntu distribution of Linux. I hate to say it but it is just to much of a pain to do anything in it. Don't get me wrong i love the fact that everything that is needed for most new Linux users comes pre-installed. I'm not a normal user. I like to try stuff. I like to install new versions of Beryl. I like to install WINE, and run PC games. I have to work in a program named Condor for GRID computing that isn't supported in Ubuntu. I hate to say it but Ubuntu just isn't getting it for me. I am seriously considering switching over to either Suse or Fedora. I'm leaning greater to the Fedora side because of user lead forums and what not. I guess this is a part of every Linux users plight. Since Linux isn't standardized or centralized different distributions may be better for a person or companies particular situation. It sucks but so is life you know? So --Ubuntu guys I am sorry but I just can't take sudo'ing everything anymore. I want a root account. I want to be able to use su. I want some of the power of true Linux back. So I am going to have to jump ship to a different distribution.

Friday, July 20, 2007

I can't run "make" in Ubuntu

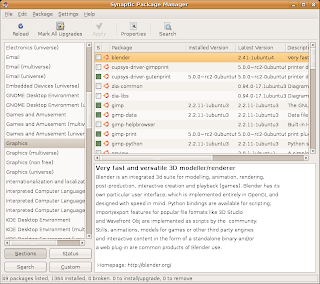
I have tried to install a couple things that kept asking me to "./configure" and then"make install". I kept getting a "unknown command" when I tried to run it. Well after a bit of searching I found out that this was because there was no C/C++ Compiler installed. Websites spoke of all types of freaky weird ways to make it work when I came upon a post about "Synaptic Package Manager" which was a life saver.

Basically Synaptic is a graphical version of apt-get which if you have run across...you will. Apt-get is a command line way to download and install programs in Linux from the command line (Red Hat also uses "yum"). Well the catch is that if any part of the program name has changed --say oh the version number, you may not be able to find the app.

Because Synaptic is visual you do do a simple search to visually pick what you need. (Note: If your flavor of Linux does not have synaptic you should be able to use the command apt-get update && apt-get install synaptic)

I said all that to say this. To install that elusive compiler program you can open Synaptic by

  1. Going to System > Administration > Synaptic Package Manger.
  2. Click on "Reload" to update the available packages.
  3. Click on the "Search" button.
  4. Type in "gcc" and press enter. (Note: gcc is a command line C/C++ compiler)
  5. Select all instances of "gcc" that appear
  6. Click "Apply" and the packages will be installed for you.
  7. Close Synaptic
  8. Run your "make install" command from the terminal window.
In my case I also had to add a library in which case you can go back into Synaptic and simply search or what ever library name it needs.

Special Note: Remember in Ubuntu you must add "sudo" to the front of "make" in the terminal window so the OS will not complain about permission issues.

Wednesday, July 18, 2007

Installing games in Ubuntu

Ok guys the reason i haven't been posting much is because I am currently in a battle of witts between my computer and myself. I like to play games--there I said it. I like PC games at that. There is an application called Wine that allows people to install and play windows games, and other applications in Linux. Cool beans right--wrong. The wine install was pretty easy.

Open a terminal window from "Applications --> Accessories"


sudo wget http://wine.budgetdedicated.com/apt/sources.list.d/feisty.list -O /etc/apt/sources.list.d/winehq.list


Once that is done you are supposedly able to type


sudo wine


Yeah well if during the install of the application you must say--change CDs you get the error "Cannot eject CD because application is using it". Umm yeah well that sucks. I thought I had it figured out with the "sudo wine eject" command but althogh the Cd ejected, the installation would not continue. As soon as I get this figured out I will tell yall all about it.

How to install Ubuntu (Feisty Fawn) in OS X using Parallels - a complete walkthrough

I found this on another persons site but the just did such an excellent job that I had to reprint it. The original site was: http://www.simplehelp.net/2007/04/27/how-to-install-ubuntu-feisty-fawn-in-os-x-using-parallels-a-complete-walkthrough/

How to install Ubuntu (Feisty Fawn) in OS X using Parallels - a complete walkthrough

Mac Linux

This tutorial will take you every single step of the way through installing Ubuntu 7.04 (Feisty Fawn) using Parallels for OS X. In other words, even your parents should be able to follow along.

1. Who this tutorial is for
2. Background
3. Setting up Parallels for Ubuntu
4. Running Ubuntu for the first time
5. Tidying up, adding sound and increasing the screen resolution


Who this tutorial is for

This tutorial is for anyone with an Intel based Mac who is curious about Linux - specifically Ubuntu, and has about an hour to kill (not including the time it takes to download Ubuntu).

The steps and screenshots used for this tutorial are specific to Parallels Build 3188 running on a MacBook Pro w/ OS X (10.4.9). With that said, they will be nearly identical if you have a Mac Pro, Mac Mini, MacBook or any other Intel based Apple Mac.

Background

Ubuntu is a free, open source Linux-based operating system with a clear focus on the user and usability (it should �Just Work��). When you finish your Ubuntu installation your system is immediately usable. On the desktop you have a full set of business productivity applications, internet applications, drawing and graphics applications, and games. For more information on Ubuntu, visit http://www.ubuntu.com/ubuntu.

As you may have noticed, here at Simplehelp we often recommend software, and 90-something percent of the time that software is free. Parallels isn�t free, but it really is worth the cost. It will allow you to run other operating systems (like Ubuntu) on your Mac - without having to worry about any of your OS X settings, documents or files being accidentally deleted. And if you don�t like Ubuntu you can trash it and carry on like it never happened.
One other (major) benefit of using Parallels is that you run the other operating system (in this case Ubuntu) while OS X is running. You don�t need to restart your computer each time you want to switch from OS X to Ubuntu and vice-versa.

Read more about Parallels here: http://www.parallels.com/en/products/desktop/.

This tutorial would not have been made possible (or at least it would have taken me a lot longer) without the help of Kent Bye.


Before you start - make sure to download Ubuntu from http://www.ubuntu.com/download. The file you�ll want to download (as of 4/27/07) is ubuntu-7.04-desktop-i386.iso. Also, make sure Parallels Desktop is installed.


Setting up Parallels for Ubuntu

  1. If this is the first time you�re using Parallels, the Wizard will launch automatically. If it�s not the first time you�ve used Parallels, launch the Wizard by selecting New…

  2. click to enlarge

  3. Select Custom as the type of installation mode, and then Next to continue.

  4. click to enlarge

  5. Choose Solaris as the OS Type: and Other Solaris as the OS Version:. No, that’s not a mistake. At the time of this writing, Parallels build 3188 has some issues when it comes to installing Ubuntu 7.04. Selecting Solaris as the OS will help you get around those issues, and in a later step you’ll be changing this setting anyway. Click Next to continue.

  6. click to enlarge

  7. Here you�ll need to select the amount of RAM that will be dedicated to the guest operating system (Ubuntu). If your Mac has 512MB of RAM, you�ll want to select 256MB or a bit less. Below 128MB will make Ubuntu a bit slow. Because I have 2GB in my MacBook Pro, I�ve opted to dedicate 768MB to Ubuntu - and both OS X and Ubuntu run very quickly. After you�ve selected an amount, click Next to continue. NOTE: some users (scroll way down to see comments) have reported problems when opting for more than 512MB of RAM. You may want to set it to 512 or less now - you can always increase it later.

  8. click to enlarge

  9. Select Create a new hard disk image and click Next to continue.

  10. click to enlarge

  11. Now you�ll need to set the size of the �hard drive� that Ubuntu will use. It might be possible to select less than a gigabyte (1024) and still install Ubuntu, but there would be very little room left for anything else. I would suggest 2 or more gigs (2048) at a minimum.

    Review the differences between Expanding and Plain as a disk format. Parallels suggests using Expanding, and since I�ve only noticed a small difference in performance between the two, I would suggest it as well. Either way, don�t stress out over this decision too much - you can convert from one format to the other, using Parallels Image Tool, if you ever need to. Click Next when you�re ready to continue.


    click to enlarge

  12. Select Shared Networking and then click Next.

  13. click to enlarge

  14. Give your virtual machine a name - pretty much anything is fine, so go with something descriptive. You may also want to click the More Options link if you want to change the default location for the virtual machine files (generally not necessary). You can also remove the check from the box labeled Create icon on Desktop if you like to keep an un-cluttered desktop. Once again, click Next.

  15. click to enlarge

  16. Click More Options and select ISO image. Then click the Choose… button and navigate to your Ubuntu .iso file (ubuntu-7.04-desktop-i386.iso). Make sure Start Other Solaris installation is checked, and then click Finish.

  17. click to enlarge

Running Ubuntu for the first time

  1. Ubuntu will now boot for the first time. When you’re presented with the boot: prompt, enter in the following: live vga=790 and then hit ENTER (on your keyboard).

  2. click to enlarge

  3. Watch the pretty line…

  4. click to enlarge

  5. And here you are. Because the .iso file you downloaded is a “Live” image, you can actually play around with Ubuntu right now. You won’t have sound (we’ll fix this later) and you probably won’t be connected to the Internet (again, we’ll fix it later) so lets just get on with the installation. Double-click the Install icon on your Ubuntu desktop.

  6. click to enlarge

  7. Select your language of choice and then click the Forward button.

  8. click to enlarge

  9. Choose your location from the drop-down list, and then click Forward.

  10. click to enlarge

  11. Select your keyboard layout, and you guessed it, click Forward.

  12. click to enlarge

  13. Leave the default options selected (Guided and SCSI1 and then click Forward.

  14. click to enlarge

  15. Nothing to import, so click Forward

  16. click to enlarge

  17. Enter your Name, the name you wish to use to login, a password and whatever you want to call your “Ubuntu computer” in the spaces provided. Once again, click Forward.

  18. click to enlarge

  19. And now finally, click the Install button.

  20. click to enlarge

  21. Go get a cup of coffee or your beverage of choice. This can take a while.
  22. Update: a number of folks have noted that they get ’stuck’ at this stage, particularly during hardware detection. Yesterday, while installing Ubuntu on a friends MacBook Pro, I encountered the same error - it hangs at “piix Intel 82801BA IDE”. The solution, in my case, was to power off the virtual machine (the red square icon in the right column of Parallels Desktop), and power it back on (the green arrow). The 2nd time I tried to install Ubuntu, it went right through with no problems. I made no changes to any of the configurations (above steps), I simply “tried again” - and it worked.


    click to enlarge

  23. When the installation is complete, choose Restart now.

    Don’t be at all surprised if Ubuntu doesn’t actually shut down properly. I’ve actually yet to have it restart on it’s own, it always ‘hangs’ at a blank black screen. If this happens to you, use the Stop Virtual Machine button in the upper-right corner of Parallels. The red square one.


    click to enlarge

Tidying up and adding sound

  1. Back at the Parallels configuration window for your Ubuntu machine, click the Configuration “link”.

  2. click to enlarge

  3. Now it’s time to set things straight. Make sure that Options is selected from the Resource list in the left side of the window. On the right side, change your OS Type: from Solaris to Linux and the OS Version: from Other Solaris to Other Linux kernel 2.6.

  4. click to enlarge

  5. Select CD/DVD-ROM 1 from the Resource list, and then change the Emulation from Use image file to Use CD/DVD-ROM.

    Then click the Add… button in the lower left corner.


    click to enlarge

  6. Select Sound and then click Next

  7. click to enlarge

  8. Leave the defaults selected, and then click Finish.

  9. click to enlarge

  10. Back at your Ubuntu configuration window, click OK.

  11. click to enlarge

  12. Alright, it’s go time. Start up Ubuntu by click the Start Virtual Machine button (the green arrow in the right column).

  13. click to enlarge

  14. Don’t be at all surprised or alarmed if you see an error message (ACPI: Unable to locate RSDP) flash on your screen. It’s a known issue.

  15. click to enlarge

  16. Again, do not be the least bit surprised if you find yourself staring at a blank, black window. Just wait a few more seconds..

  17. click to enlarge

  18. … and you’ll get to the login window! Enter your user name in the space provided and hit enter (on your keyboard).

  19. click to enlarge

  20. Enter your password and again click enter.

  21. click to enlarge

  22. That’s it - you’re done! Well almost. Select the Internet status icon in the upper-right corner of your Ubuntu desktop, and choose Wired Network. Assuming your Mac is online, Ubuntu will now be connected to the Internet as well. Have fun! If you want to increase Ubuntu’s screen resolution, please see this post.

Monday, July 16, 2007

Burning the Ubuntu ISO in Mac OS X

Some quick steps for you once you have downloaded you distribution (Linux ISO file) to burn it to a CD or DVD.

  1. Insert a blank CD-R or DVD (Note: if you have downloaded a DVD ISO image file you must have a DVD Burner to burn it to . A regular CD-R/RW drive will not burn a DVD image or auto-magically split it up for you.)
  2. Go to "Hard drive --> Applications --> Utilities --> Disc Utility"
  3. On the menu bar select "Images" and then "Open"
  4. In the browse window, select the ISO image you downloaded.
  5. Click the mounted image in the left frame and then click the "Burn" icon in the left corner.
  6. Once the CD is burner, close "Disc Utility"

Monday, July 9, 2007

So many flavors so little time

Ok so I am pretty set on using Ubuntu because everyone talks about it and the owner is a Dot-com millionaire that wanted to give back. More to come very soon but you can download Ubuntu or have it sent to you from the site www.ubuntu.com !!